My next Arduino lesson, after learning about reading sensors, data logging, and the Linux/Arduino Bridge for web logging and dat/time stamping in the last installment of Arduino Life (Arduino Life 2: Getting Geeky in the Garden: Temperature, Humidity and Light Level Sensor [Video] (20:21)), I wanted to turn the process around on itself and learn how to poll the Arduino sketch for information and settings using the provided YunServer and YunClient software so that I could receive results directly into a web page, via a web request.

The Arduino and Breadboard setup remain the same as before. I had a bit of an issue when starting to work on this version, as the DHT11 had become unplugged from the board. When re-inserting it, I was off by 1 pin on the breadboard and ended up running +5v through the sensor and “letting the magic smoke out.” (LAUGH) This is one disadvantage to using a breadboard instead of male/female jumper wires (which I plan on purchasing in my next order.) Directly connecting to the sensor via wires makes it less likely to error and connect things up wrong.

Dead DHT11
While the sensor reading portion of the code remains pretty much the same, responding to web Client requests requires a little fiddling and, basically, manually handling each request rather than simply serving up a web page. I have looked into serving up complete web pages — and I think it is easy enough to do — but I’ll leave that for the next stage in the process.
All the code for this project/sketch is available in text format — thl-on-demand.txt
Let’s step through the code and the results.
// Sensor data on demand
//  Via web REST interface
// Note: It can take a while for the Yun to connect to WiFi after a cold boot.
// I have configured my Yun to light the WLAN light on the board when connected as a reminder

// Mailbox handles REST request from a web URL
#include
// Servers up files and data from web
#include
// Handles web client requests and delivery of data to browser page
#include
// Library for DHT11 Temperature and Weather Sensor
#include

// DHT11 Connected to pin 2 on the Arduino
int pinDHT11 = 2;
// Initialize the DHT11 library
SimpleDHT11 dht11;

// Photoresistor connected to Analog Pin A0
int  sensorPin  =  A0;
int  lightLevel =  0;  // variable to  store  the value  coming  from  the sensor

//  Start YUN Web server
YunServer server;
Set up all the various necessary libraries, and sensors and fire up the YunServer to prepare for receiving web requests
void setup() {
 // Set Built-in LED as output and make sure it is off
 pinMode(13, OUTPUT);
 digitalWrite(13, LOW);
 // Initialize Bridge and Mailbox -- Takes a few seconds
 Bridge.begin();
 Mailbox.begin();
 // Light LED 13 when Bridge is running and ready to interact with user
 // This can take a few seconds, hence the notification light
 digitalWrite(13, HIGH);
// Initialize Serial for debugging purposes, if needed
 Serial.begin(9600);
// Tell server to start listening for connections
 server.listenOnLocalhost();
 server.begin();
}
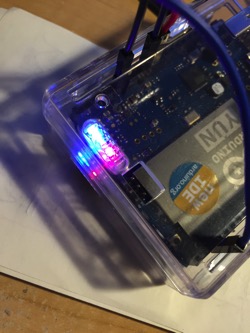
Arduino Yun Lights (White: Power, Blue: connected to WiFi, Red: Yun Bridge Active)
In the Setup function we use LED 13 as an indicator that the Bridge between the Linux and Arduino side is initialized and running. The Serial Monitor is initialized, just in case we need it for debugging, You could comment this out once things are running OK. Then we tell the YunServer to start listening for incoming web client requests locally.
void loop() {
 // Check for web browser accessing server -- if client request is made, process it
 YunClient client = server.accept();
// If a client is asking for data, do this
 if (client) {

 // Read in the command - i.e. string following arduino.local/arduino/
 String command = client.readString();
 // Trim Carriage Return - Required as ReadString includes carriage return on end of string
 command.trim();
In the first part of the loop. we check to see if a web client has requested information from the Arduino with the URL in the form:
http://arduino.local/arduino/<insert request here>
This assumes an Arduino Yun configured with defaults such that the name of the Arduino Yun is simply arduino. If you use a different name, replace the defaults with your custom name.
If a client has requested data, then read in the REST request and discard all but the word after the last / . This gave me a bit of bother in parsing it for the next section of the code where I use If/Else If/Else statements to figure out what the command should do. It took me a while to figure out that the “command” variable was included a invisible \n at the end. command.trim() takes care of that, leaving only the text we want/need.
// ---------- Gather data from sensors ----------
 // Get Date and Time from Yun Linux Side
 String dataString;
 dataString += getTimeStamp();
// read with raw Temperature and Humidity data.
 byte temperature = 0;
 byte humidity = 0;
 byte data[40] = {0};
 if (dht11.read(pinDHT11, &temperature, &humidity, data)) {
 client.print("Read DHT11 failed");
 return;
 }

 // Read Light Level Data from Photoresistor
 lightLevel = analogRead(sensorPin);
 // Convert to 1023 point low to high scale
 lightLevel = map(lightLevel, 0, 1023, 1023, 0);

 // ---------- End Gather data from sensors ----------
Instead of reading the sensors continuously, we gather the data when the is client activity. I wonder if this would help with power consumption if you were using this one battery power, but it would take more investigation and further optimizations, I would guess. This code is the same as the original, gathering Date/Time from the Linux side (using the getTimeStamp function at the end of the code, temperature and humidity from the DHT11 and light level from the photoresists. To get a little more granularity in the light level data, I have returned to using a 0-1023 scale. The 0-100 scale seemed to indicate full light (90%+) even when the sun wasn’t directly shining on the sensor, so I did this to hopefully get a little better and finely tuned data.
// Respond to Web REST Commands
// Define each command you wish to respond to and also failure case
if (command == "temp") {
 client.print(dataString+"\n");
 client.print("Temperature: ");
 client.print(temperature);
}
else if (command == "humid") {
 client.print(dataString+"\n");
 client.print("Humidity: ");
 client.print(humidity);
}
else if (command == "light") {
 client.print(dataString+"\n");
 client.print("Light Level: ");
 client.print(lightLevel);
}
else if (command == "all") {
 client.print(dataString+"\n");
 client.print("Temperature: ");
 client.print(temperature);
 client.print("\n");
 client.print("Humidity: ");
 client.print(humidity);
 client.print("\n");
 client.print("Light Level: ");
 client.print(lightLevel);
 client.print("\n");
}
else {
 // If command isn't in list, return command listing
 client.print("Command Not Recognized\n");
 client.print("Avaiable Commands: temp humid light all\n");
}
 // Close client session and pause
 client.stop();
 delay(50);
 }
}
Now, we take the command gleaned from the web URL above and check it against our available commands. I include the final ELSE statement block to return an error message and list of available commands. While you probably wouldn’t want or need to request these individual pieces of data, I have done it here as an exercise to show how you could respond to multiple commands.
Output from each command is:
http://arduino.local/arduino/temp
Sat May  7 19:42:30 PDT 2016
Temperature: 24
http://arduino.local/arduino/humid
Sat May  7 19:43:35 PDT 2016
Humidity: 49
http://arduino.local/arduino/light
Sat May  7 19:44:12 PDT 2016
Light Level: 758
http://arduino.local/arduino/all
Sat May  7 19:44:44 PDT 2016
Temperature: 24
Humidity: 48
Light Level: 759
Error Condition
Command Not Recognized
Available Commands: temp humid light all
The final code contains a function that gets the current date and time from the Linux side of the Arduino Yun
// *********** FUNCTIONS ************
// Functon to get Time Stamp from Yun Linux Side
String getTimeStamp() {
  String result;
  Process time;
  time.begin("date");
  //time.addParameter("+%D-%T");
  time.run();

  while(time.available()>0) {
    char c = time.read();
    if(c != '\n')
      result += c;
  }

  return result;

}
As you can see , the sketch returns bare text data. There seems to be a way to include HTML Content-Type headers and such in the client.print() calls, but I haven't gone that far yet. It would also be possible to use a companion python program to grab the data from the sensors and then build a formatted HTML doc that could be served up from the YunServer, and I will investigate that for a future project.
Please send along your questions and comments.
- Greenhouse Temperature, Humidity and Light Level Arduino Project Overview
- Powered by USB power bank
- Arduino Yun connected to breadboard for power and sensor data
- Local WiFi connection via Arduino Yun for data reporting
- Read Temperature and Humidity using blue sensor at top
- Read current light level using photo-resistor and converting to 100 point scale (0-100, with 0 being total darkness)
- Date and Time pulled from Linux side of Arduino Yun
- Sketch responds to web REST requests and provide sensor data via web browser
- DOWNLOAD CODE for this project
Comments